Friday, December 17, 2010

How to Measure Drill Bits

So a question we get a lot is "what drill bit should I use for my project?"

It is a good question because the success or failure of many projects-- especially those that involve riveting-- depends on drilling the correct size hole for the wire or findings needed.

Drill Gauge
The best tool for determining the right jewelry drill bit size for the job is a drill bit gauge that measures small drill bits. For larger bits, you will need a larger gauge. Almost all the bits we use can be measured using the 1 to 60 drill bit gauge.


How to Use the Gauge
The gauge is easy to use. Take a piece of wire the size you plan to use for your project or the same size as your finding and slip it into the hole of the gauge that fits snug. The hole that fits is the exact size of the drill bit. If you are riveting, then you will want to use the same size bit as is the wire. If you are putting a wire through the hole as a finding, then you will want to use a drill bit that is larger than the wire so the finding can move freely when fed through the drilled hole.

Test the Drill Bit
Once you tested the wire, pick up the drill bit and slide it into the hole to be sure you have the correct size.

Mystery Bits
If you are like us, then you have a box that is filled with drill bits of different sizes. We often use the drill gauge to determine the size of mystery bits before we begin drilling.

Related Tutorials
How to Drill
How to Use a Drill Press for Jewelry Making
How to Remove a Drill Bit that Broke Off in Your Art Jewelry During Fabrication
How to Use a Dremel to Make Jewelry
How to Use a Flex Shaft to Make Jewelry
GeltDesigns Tutorials by Topics
New Jewelry a Day


Happy  drilling!


Wednesday, December 8, 2010

Chanukah Craft and Jewelry Projects

 Dreidel Pendant by GeltDesigns
Chanukah is always a lot of fun, but this year we were especially creative using Chanukah objects in the upcycling, repurposing challenge we issued to ourselves for the year.


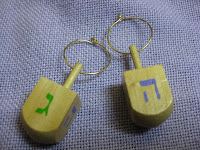
 Dreidel Earrings by GeltDesigns
Here are three tutorials for Chanukah jewelry made from dreidels, bottle caps and other reclaimed materials:

Make Chanukah Menorah Earrings from Plastic Bottle Caps
Make a Dreidel Pendant
Make Dreidel Earrings

If jewelry making is not your thing, here are links to other Chanukah projects you may enjoy on this last night:

Make Your Own Dreidel
Chanukah Craft Projects for Kids
How to Make a Hanukkah Menorah


Happy Chanukah from the girls at GeltDesigns!

Friday, December 3, 2010

Jewelry from Found Objects

So it is almost two weeks since we began our adventure in upcycling. With the holidays coming, we issued ourselves a challenge: no purchasing items to make gifts or new craft projects. The rules are clear: use up what we have and use as many found objects as we can. We can repurpose, recycle, upcycle or otherwise reuse old stuff. We can sift through the recycling cans of neighbors, friends and even readers. We can incorporate craft materials and outgrown or broken toys from the toy box, but the goal is to solve jewelry making tasks every day using found materials.

Everyday we are publishing a new jewelry project made from these found objects on our new blog called New Jewelry a Day.   Of course, what we have in and around our house and studio may not be in yours, but we hope our ideas will help stir your creative thoughts.

Here is a list of jewelry projects from found items to date:

Buttons
 Chain
Copper Pipe
Glass
Elastic Hair Bands
Riveted Scrap Metals
 Steel Wire
Toys
Here is our score card to date:
Day 12. Week 2. Jewelry from Found Objects.  $ spent: 0
New Jewelry a Day.   Join our adventure.

Monday, November 29, 2010

Thoughts on Soldering Torches & Other Equipment

One of the most common questions we get about soldering is "what type of torch should I use?" It is an important question as there are a lot of different torches to evaluate and there are many different fuel choices as well.

My answer is often frustrating. It really does not matter. Many artisans will speak passionately about their torch. That is good since it means the artist selected well for their needs, but what torch is best is a matter of preference. There is no one perfect torch any more that there is one perfect car. The perfect torch is the one that works best for you for the projects you undertake most often.

Consider the cost, size/heat of the torch, available torch tips and fuel when you select your soldering torch. If you are making jewelry for a hobby and are just beginning then a low cost Blazer GB2001 Self-Igniting Butane Micro-Torch may be just the ticket. If you plan to become a professional metalsmith, then you may want to invest in the more advanced torch set up using acetylene (or acetylene and oxygen if you want an even hotter fuel) such as the Smith Little Torch with 5 Tips. If you are looking for a torch that is larger than a butane torch, less expensive than a jewelry torch and availalbe in the hardware torch than you should consider a plumber's torch using propane (or propane and oxygen), such as the  Bernzomatic - Welding, Brazing, and Cutting Torch Kit (OX2550KC)

Regardless of the torch you pick, there are certain soldering tools that I would not want to live without. These include:

1. Charcoal soldering block. Charcoal blocks radiate heat and make it easier to bring your piece up to soldering temperature. Charcoal blocks are especially helpful if you are using a butane or other low temperature torch.

2. Soldering pad size 6 X 6 X 1/2 and size 6 X 12 X 1/2. You can stick pins in these soldering pads to hold your piece in place when you solder.

2. Soldering and annealing pan. Fill the annealing pan with the pumice pebbles. Place the soldering pad on top of the pumice (and the charcoal block on top of the soldering pad). I like a pan that spins. Being able to move the pan makes in easier to focus heat where you need it without disturbing your piece while you solder. Use the pumice to reflect heat and support and arrange your piece while soldering.

3. Third hand or double third hand. We all would like to have assistants but these tools are the next best thing. Third hands can also be used to act as a heat sink when soldering really small parts, like posts on earrings.

4. Soldering, brazing and welding safety goggles. Protect your eyes. Always wear safety goggles when looking at a flame.

5. Ventilation fan, hood or system. There are many available to suit your work space, but having proper ventilation when soldering is a must.

6.  Range Kleen Counter Mat. Our studio is not large enough to have a single area dedicated to soldering alone. All our work surfaces have to be used for multiple task. We put down the metal  counter mat when we solder since it is an inexpensive, fire safe work surface.

Related Tutorials
Soldering Tips for Jewelry Makers
Soldering Checklist
How to Prepare Metal for Jewelry Soldering
How to Make Pickle
How to Solder Using a Small Butane Torch
How to Correct Soldering Problems when Jewelry Making
How to Light a Torch
Braze Aluminum Tubing
 
Further Reading
Step-by-Step Jewelry Workshop: Simple Techniques for Soldering, Wirework, and Metal Jewelry (Step By Step)
Hot Connections Jewelry: The Complete Sourcebook of Soldering Techniques
Art Jewelry Magazine: Precision Soldering Simplified; Give a Classic Ring a Twist with an Easy Forging Technique; Make a Basic Chain with Spring Links (Vol.3 No.1 November 2006)
The Complete Guide to Jewelry Soldering: What Works, What Doesn't, and Why!
Complete Metalsmith: Professional Edition

Happy soldering!

Tuesday, November 23, 2010

How to Measure Wire

Wire Gauge
Yesterday we explained How to Make an Ear Cuff. In that entry, we included a link to General Tools 20 American Standard Wire Round Gage. One of our readers wrote in and aksed how and why does she need a wire gauge. Fair question.

If you love making jewelry like we do, you likely collected a variety of different size wire from different projects. Some of the wire is no longer in the original package and it may not always be obvious what wire is what size. To identify the gauge of mystery wire we use the Brown and Sharpe wire gauge (also called an American wire gauge). Using a wire gauge, you can measure your mystery wire and determine its gauge.

A little background
The Brown and Sharpe wire gauge (aka the American Standard wire gauge) is a standardized system developed in the United States in about 1857 to measure the diameter of round, solid, nonferrous wire. The cross-sectional area of wire gauge is a very important for determining the electrical current-carrying capacity of wire. In the jewelry industry, the B and S standard is used to measure all shapes of wire and sheet stock. The tool is very easy to use and will take the mystery out of your wire collection.

Step 1
Slide Wire into Slot
Slide the mystery wire into the slot that looks like it is the size of the wire. If that slot is not correct, try again. The wire should fit snug, but you should not need to force the wire for it to fit.
Step 2
Look at the number on the slot. In the photo at left, the mystery wire measures as 18 gauge. Mystery solved! The American Standard Wire Round Gage tool measures wire ranging from 0 to 30 gauge. Although it is counter-intuitive, using the scale on the gauge, "O" is the largest, thickest wire. "30" is the smallest, thinnest wire.
Step 3
Use your tool to select the correct wire for your project. There are no right or wrong sizes of wire to be used in jewelry making. These are typical sizes of wire used in jewelry making projects:

Ear wires: 21 or 20 gauge
Head pins: 22 to 18 gauge
Wire wrapping briolettes: 22-26 gauge, depending on hole size
Wire wrapping pearls: 22-26 gauge, depending on hole size
Wire wrapping lamp work beads: 18-16 gauge, depending on hole size
Pendants: 18 to 20 gauge
Bangles: 14 gauge
Neck rings: 14 gauge
Ring shanks: 10-12 gauge

Tips and Warnings
Always wear eye protection when cutting wire.
A different standard is used to measure wire in the United Kingdom: the Imperial Standard Wire Gauge (aka the British legal standard).
In other parts of the world, the diameter of wire is measured using the metric system in millimeters.

Further Reading
Tutorials by GeltDesigns
Complete Metalsmith: Professional Edition
Jewelry Studio: Wire Wrapping
Wirework w/DVD: An Illustrated Guide to the Art of Wire Wrapping
Contemporary Wire Wrapped Jewelry (Jewelry Crafts)
Wire Style: 50 Unique Jewelry Designs
Inspired Wire: Learn to Twist, Jig, Bend, Hammer, and Wrap for the Prettiest Jewelry EverBead on a Wire: Making Handcrafted Wire and Beaded JewelryCreative Wire Jewelry
Creative Wire Jewelry

Monday, November 22, 2010

Make an Ear Cuff

An ear cuff is a piece of jewear cuff jewlryelry for the ear that does not require piercing.  The ear cuff hugs the outer portion of the ear. Ear cuffs do   not require the use of findings-- pierced or clips.
Step 1


Gather the your tools and materials. You will need: 
--wire wrapping tools  
--20 gauge sterling silver or gold filled wire
--pencil or dowel
Step 2
Cut two and one half (2-1/2) inches 20 gauge surgical steel, sterling silver or gold filled wire with your wire cutters.cutting wire
Step 3
Finish the ends. You can create simple ends for your ear cuff jewelry by filing the ends smooth with a needle file, cup burr or wire rounder. You can create fancy ends for your ear cuff jewelry by burning the end of the wire until it creates a ball. If you chose to create a balled end then you will need to add an inch or two to your wire so that the wire with finished end is about two and one half (2-1/2) inches. See our tutorial How to Make a Ball Head Pin.
Step 4
Create a loop on either end of the wire with your needle nose pliers.
bent wireStep 5
Measure 3/4 of an inch from the end of one wire and create a "U" shaped bend using your needle nose pliers.
u shaped wireStep 6
Repeat on the other side of the wire.
Step 7
Wrap the formed wire around a pencil, pen, marker or other dowel into the shape you want for your ear cuff jewelry. You may need to hit the ear cuff jewelry gently with a raw hide or plastic mallet to form the ear cuff to your specifications.wrap around a pencil
Step 8
Test the ear cuff jewelry and adjust the size as needed.
Step 9
Place the ear cuff jewelry into a tumbler with stainless steel shot to harden the wire and prevent the ear cuff from becoming misshapen waterduring use.

Tips & Warnings
This design is for a very simple type of ear cuff jewelry. You can create your own design by adding wiggles or shapes to the wire. You can also change the look of your ear cuff jewelry by adding beaded drops.

Resources
Tutorials
How to Wear Ear Cuff Jewelry
How to Wear an Ear Wrap
Books
All Wired Up: Wire Techniques for the Beadworker and Jewelry Maker (Beadwork How-To)
Great Wire Jewelry: Projects & Techniques (Lark Jewelry)
Creative Wire Jewelry 
Jewelry Studio: Wire Wrapping
Wirework: An Illustrated Guide to the Art of Wire Wrapping
Wire Wrapping: The Basics and Beyond
Wiresmithing -The New Look Of Wire Art

Wire Cutters
Beadsmith Jewelry Wire Side Cutters (Nippers) Pliers
Flex-Wire Cutter
Xuron 410 Micro Shear Flush Cutter
 Wire Rounder
Wire Rounder Beading Tool
Wire Rounder Set With Pin Vise and 2 Cup Burs
Wire Gauge
General Tools 20 American Standard Wire Round Gage
Pliers
Wire Looping Pliers 3 Round Jaws and 1 Concave Jaw
Eurotool Beginner to Advanced Wire Wrap Tool Kit & Book
8Pc Pliers Set Jewelers Beading Wire Wrapping Tool New
Tumbler
Lortone 3A Lapidary Rock Gem Rotary 3 Lb. Tumbler New
Lortone 33B Twin Barrel Rock Tumbler